 Headlines
 Annotate Documents: Public, Private, and Draft Notes
sourceAFRICA supports both private and public notes. Public notes are visible to anyone who has access to the document, while private notes are only ever visible to their author. Public notes may also be saved as drafts: draft notes are visible to anyone with the privileges necessary to annotate a document, including reviewers and collaborators, but they won't be published with the document.
Annotate any document by opening and selecting either "Add a public note" or "Add a private note." Your cursor should change to crosshairs: click and drag to select the area you'd like to highlight. When you release the cursor, you will be able to add and save your note.
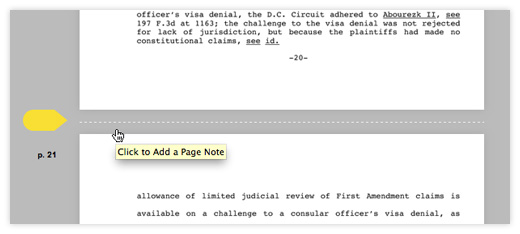
To annotate a page in general rather than just a region of it, hover the annotation crosshair in the gutter between pages. A note tab and dotted line will appear — click near the line to create a note that sits between the pages.
It is not possible to resize a note. Instead, copy the contents, delete the existing note, and redraw it.
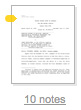
Notes on a document are available in the workspace as well as in the open document. Use the "notes" link underneath any document thumbnail to display all of the document's notes in the workspace. Each note's title links to that note in the document viewer. If you have permission to edit a document, you can also edit the notes from inside the workspace itself. If you're changing notes in the workspace and in the document viewer simultaneously, you may need to refresh the page to see the latest changes.
Markup and HTML in Notes
Note bodies can contain a limited subset of HTML and attributes. The table below lists some commonly used elements and attributes. You can find a full list beneath the table.
| Element | Description | Attributes |
|---|---|---|
| <a> | creates a hyperlink | href |
| <img> | displays an image | src, width, height, alt, align |
| <br/> | inserts a line break | – |
| <em>, <i> | emphasizes/italicizes text | – |
| <strong>, <b> | bolds text | – |
| <u> | underlines text | – |
| <blockquote> | offsets text as a quote | – |
| <table> | creates a table into which rows (tr elements) are inserted | summary, width |
| <tr> | creates a table row to hold table data (td elements) and table headers (th elements) | – |
| <th> | creates a table header cell | abbr, axis, colspan, rowspan, width, scope |
| <td> | creates a table cell in a "tr"" row | abbr, axis, colspan, rowspan, width |
| <ol> | creates a numbered ordered list | start, reversed, type |
| <ul> | creates is a bulleted unordered list | type |
| <iframe> | An iframe can be used to embed web pages. | src, srcdoc, width, height, sandbox |
Complete list of available HTML tags
a, abbr, b, bdo, blockquote, br, caption, cite, code, col, colgroup, dd, del, dfn, dl, dt, em, figcaption, figure, h1, h2, h3, h4, h5, h6, hgroup, i, iframe, img, ins, kbd, li, mark, ol, p, pre, q, rp, rt, ruby, s, samp, small, strike, strong, sub, sup, table, tbody, td, tfoot, th, thead, time, tr, u, ul, var, wbr
Linking to Notes
Link directly to any note: to find the URL (or permalink) of a note, open the note and select the link icon . Your browser's address bar will be updated to display the full URL of the annotation. The good stuff comes after the # symbol — in our example the URL of the embedded document ends with #document/p173/a8646, so we know that the annotation is on page 173. The annotation itself is identifed by a random string (in this case "a8646").
You also can embed a note directly. See our publishing and embedding documentation for details.
Printing Notes
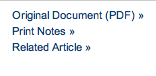
It's easy to print out all the notes on a particular document or collection of documents. If you're in the workspace, select the documents, open the "Publish" menu, and click "Print Notes." While viewing a document, you'll find the link to "Print Notes" in the sidebar.
Deleting Notes
To remove a note from your document, open the note by clicking on it. Next, click the pencil icon at the top to enter edit mode. Then click the Delete button to remove the note. Important: Deleting a note cannot be undone, so proceed with caution.
Adding Sections for Navigation
To help differentiate portions of a long document, you can add navigation links to the sidebar by defining sections. Inside of the document viewer, click on "Edit Sections" to open the Section Editor dialog. Add a title, starting page, and ending page for each section. Use the plus and minus icons to add and remove rows. When you're done, don't forget to save.
Questions?
Still have questions about annotating documents? Don't hesitate to contact us.